Master Remote IoT: Raspberry Pi & AWS VPC SSH Guide
Are you looking for a way to securely manage your IoT devices from anywhere in the world? Mastering remote IoT VPC SSH on Raspberry Pi with AWS is the key to unlocking efficient device management and robust security.
This comprehensive guide delves into the intricacies of setting up a secure and efficient remote IoT environment using a Raspberry Pi on Amazon Web Services (AWS). Whether you're a seasoned developer, a passionate hobbyist, or a business professional, the ability to securely connect your devices over the internet is now within reach. We'll cover everything from the initial setup of your Raspberry Pi to configuring an AWS VPC and establishing secure SSH connections. This isn't just another tech article; it's a deep dive designed to provide you with the knowledge and practical steps needed to create a powerful remote access solution. We'll explore the core concepts, best practices, and essential components that make this setup a reliable and scalable option for your needs. The aim is to give you a clear and detailed walkthrough, ensuring you can seamlessly configure your Raspberry Pi for remote access.
Here's a breakdown of the key components involved in setting up remote IoT VPC SSH for Raspberry Pi:
| Component | Description |
|---|---|
| Raspberry Pi | A small, affordable single-board computer that serves as the central device in your IoT setup. |
| AWS VPC (Virtual Private Cloud) | A logically isolated section of the AWS Cloud where you can launch AWS resources in a network that you define. |
| SSH (Secure Shell) | A cryptographic network protocol for operating network services securely over an unsecured network. |
| AWS Account | An account with Amazon Web Services, necessary for using AWS resources such as VPC and EC2 instances. |
| Internet Connection | A stable internet connection is required for both the Raspberry Pi and your access device. |
The benefits of using a remote IoT VPC SSH setup are numerous. You can access your devices from anywhere in the world, troubleshoot issues remotely, and monitor performance. The encrypted nature of SSH ensures that all data transmitted between your local machine and the Raspberry Pi is secure, providing peace of mind when dealing with sensitive information. This guide will help you harness the power of remote access, allowing you to control and manage your IoT devices with confidence.
The "Remote IoT VPC SSH Raspberry Pi AWS Free" option is a fantastic solution for developers, hobbyists, and businesses alike, seeking affordable and secure remote access to their devices. The AWS Free Tier offers various services for free, making it a great starting point for those wanting to experiment without incurring significant costs. By following this guide, you'll be able to craft a secure, scalable system that meets your specific requirements. The focus is on making sure your Raspberry Pi is protected from unauthorized access, while simultaneously enabling efficient remote management capabilities.
To begin, let's dive into the fundamental steps required to configure your Raspberry Pi for remote access via SSH. These steps are crucial for establishing a secure connection between your device and the AWS VPC. Here's how you can enable SSH:
- Log in to your Raspberry Pi and open the terminal.
- Type the following command to enable SSH:
sudo raspi-configThis command opens the Raspberry Pi configuration tool.
- From the menu, navigate to "Interfacing Options" and select "SSH."
- Choose "Enable" and then exit the configuration tool.
- Your Raspberry Pi is now ready for remote access via SSH.
Remote IoT VPC SSH on Raspberry Pi using the AWS Free Tier is a powerful solution for developers and tech enthusiasts. It allows you to connect your devices securely over the internet. The following steps will guide you through the process of configuring SSH on your Raspberry Pi:
- Enable SSH in the Raspberry Pi configuration settings. You have already seen how to do this.
- Generate SSH keys for authentication. This is important for security. We will cover this later in the guide.
- Set up port forwarding on your router. You need to make sure your router allows external connections to your Raspberry Pi.
- Test the SSH connection from a remote machine. After completing all the steps, test your connection to ensure it works.
By configuring SSH correctly, you can ensure secure and reliable remote access to your Raspberry Pi, enhancing the usability and management of your IoT projects.
To connect your Raspberry Pi to an AWS VPC, you first need to create and configure the VPC settings.
- Log in to the AWS Management Console and navigate to the VPC dashboard.
- Create a new VPC.
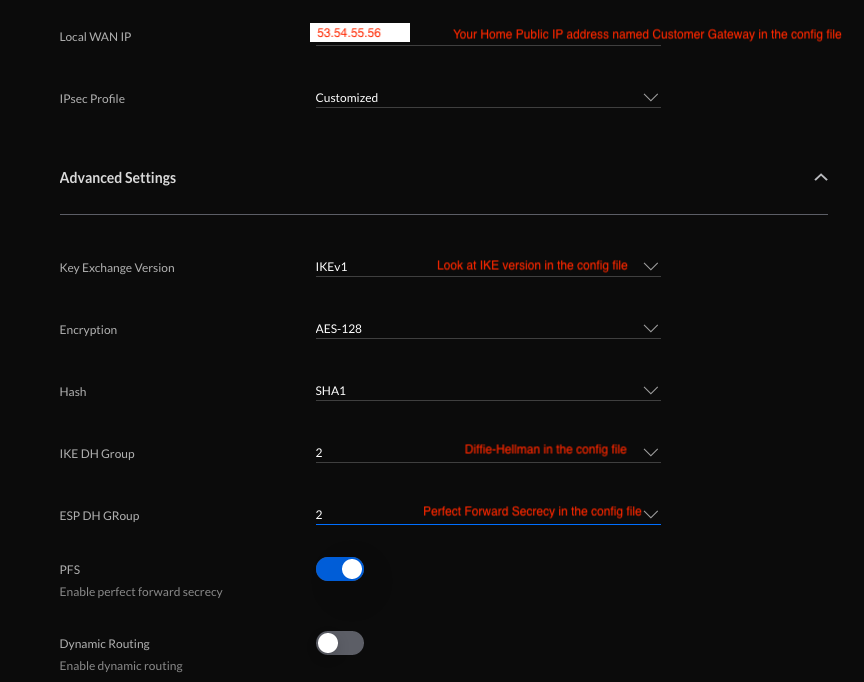
This is the process of creating a secure connection between your Raspberry Pi and Amazon Web Services (AWS) using a Virtual Private Cloud (VPC). This setup lets you control and manage your IoT devices from anywhere in the world.
Heres the detailed steps to connect your Raspberry Pi to AWS:
- Create an IAM user with appropriate permissions. IAM (Identity and Access Management) is used to manage access to AWS resources.
- Install the AWS CLI on your Raspberry Pi and configure it with your credentials. The AWS CLI (Command Line Interface) lets you interact with AWS services.
- Set up an EC2 instance in the same VPC as your Raspberry Pi. An EC2 instance is a virtual server in the AWS Cloud.
- Use SSH to connect to your EC2 instance and test the connection. This validates that your AWS setup is working correctly.
Remote IoT VPC SSH Raspberry Pi AWS download refers to the process of securely managing and accessing Raspberry Pi devices through a virtual private cloud (VPC) hosted on amazon web services (AWS). This setup leverages SSH (Secure Shell) to establish encrypted connections, ensuring that data transmitted between your local machine and the Raspberry Pi is secure. By installing the operating system, you prepare your Raspberry Pi for remote access.
Before diving into the setup, you'll need to ensure you have the necessary tools in place. To install the operating system on your Raspberry Pi, you'll typically need an SD card reader and a computer to flash the operating system image onto the SD card. The tools you'll use vary depending on the operating system you choose for your Raspberry Pi. For example, if you're using Raspberry Pi OS, you might use the Raspberry Pi Imager.
With all the necessary components and software installed, you can now connect your IoT devices to your Raspberry Pi. The process will vary based on the devices you intend to connect, but the general approach involves configuring the devices to communicate with your Raspberry Pi over a network.
Remote IoT VPC SSH refers to a secure connection setup that allows you to access your IoT devices, such as a Raspberry Pi, from anywhere in the world via a virtual private cloud (VPC) on amazon web services (AWS). It offers a secure and efficient way to manage your devices. By mastering this setup, you gain the power to remotely control and monitor your IoT projects, no matter where you are.


